Showing posts with label Made it Monday. Show all posts

Monday, July 29, 2013

Publishing Pencils, Reading Group Pencils, and Resource Binders Oh My!

Once again I have another Monday Made It...
 
My goal today was to put some of the resources I have purchased on TpT this summer in binders and to make some fabulous pencils.
 
This is what I started with this morning. A pile of binders, feathers, Duck Tape, pencils, and papers.
 
 
Now, here is what I did ALL this morning.
 
First, I put these great resources into binders.
 
 
I want to give a shout-out to Laura Martin and Lori Rosenberg for sharing these resources. I snagged Laura's Math All Year and Lori's Writing Station Activities and I Can Write...Writing Menu.
 
I plan to use Math All Year for independent work during my math block and Lori's writing resources are for my Work on Writing center.
 
To stay super organized I put all the papers in page protectors so they stay nice and crisp. Also, for the I Can...Writing Menu here is what I did.
 
First, I put the cover in the cover slip of the binder for easy identification. I printed it in black and white to save on color ink.
 
Next, I printed the menu sheets in color on cardstock, laminated them and put them in sheet protectors.

 
I also put a black and white version of the menu choice in the same sheet protector. I did it this way because I plan on introducing each menu choice one at a time. I will store the colored copy in the binder until it is ready to be introduced. It also makes for easy clean up at the end of the year. I will know exactly where to put each menu choice.


Finally, I put the directions sheet behind the menu choice followed by any writing papers that go with that choice. Easy Breezy!


Now, for my second Monday Made It project of the morning.
 
 
***This is not my original idea. I found it somewhere and didn't Pin it. If it is your idea, let me know and I will give you credit.***
 
 
I found this great idea for jazzing up pencils. I made two different sets. One set for my guided reading table and the other set is what I will be calling "publishing pencils".


The feathered pencils is are my "publishing pencils". I will place this in a tin can in my writing center. I'm going to have my students use these during our writing workshop time. Once they have gone through all the steps of the writing workshop and are ready to publish their work they can use a "publishing pencil". My plan is to really emphasis how to use these pencils. The are special pencils and only work if you use your Best. First. Grade. Handwriting. :)
 
 
The pencils with Duck Tape only will be at my guided reading table. Last year there was so much wasted time when it came to pencils. I always told my little ones to bring their pencil but they always managed to forget. Imagine that! Then I placed pencils at the table but they would always take them with them. It seemed like a lose-lose situation.
 
 This year I have a solution. I am going to have pencils at my table ready to go, but they are marked  with Duck Tape so they don't go missing. Problem solved! Hopefully!


Monday, July 22, 2013

Monday Made It for the Home and School

Monday again already?!?!
 
 
This is the first time I have a Monday Made It for my home and school. I have been very busy.
 
 
#1. First, my home Made It. I was too eager for this project that I forget to take a before picture. My mom, sister, and I are prepping for a garage sale this weekend and I found this old mirror in my basement from my college days. I was going to sell it but then I thought it would look perfect as a chalkboard in my kitchen.
 
 
The board was like a brownish/copperish color. Eww, and the mirror was all funny looking. Probably because I bought it at Big Lots.
 
 
So here is what I did...


First I spray painted the whole thing with white paint. I believe I did three coats of white. I let it dry and then I painted over the mirror part with the chalkboard paint.
 
 
If I were to do it again, I would use a brush instead of a sponge roller because the chalk is all bumpy because of air bubbles. I still love it.
 
 
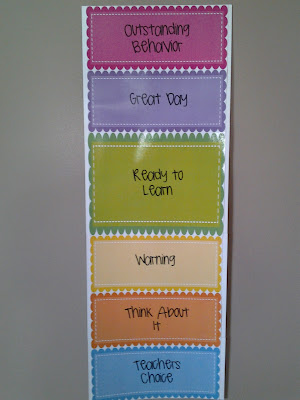
#2. Now for school, I finally put together my new behavior chart.


I love the colors, the scalloped edges, and the steps that the students can move to.
 
 
#3. My third Made It is one of my TpT items. I desperately needed to revamp my grammar book. It was too boring looking. I changed the cover page, the font, and some of the wording. If you already have this make sure to re-download it. :)
 
 
#4. And my last Made It is my new before, during, and after reading question cards. I can't even think of the number of times I thought last year I would love to have a resource like this to use. I have been waiting to see if I could find anything on in the TpT/Blog world and I just never found anything I was looking for. So , I decided to just go for it. Here is what I cam up with.
 
There are 60 question cards. 20 for before reading, 20 for during reading, and 20 for after reading. Plus ring labels that say before, after, and during reading question cards.


Now, I need to pack up some school stuff and my little man. We are off to school to set up my classroom. I will post later to tell you how it went.


Monday, July 8, 2013

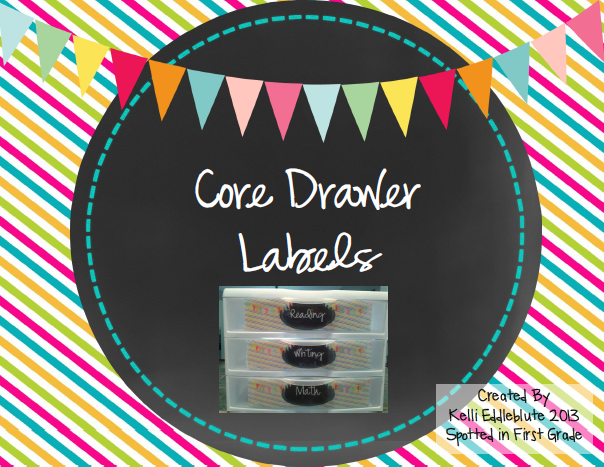
Monday Made It....Core Drawers with a Limited Time Freebie.

I am super excited about today's Monday Made It. This project was inspired by Pinterest. I tweaked it to fit my needs and I am loving it.
 
I bought the larger drawers so the labels I made don't quite fit, but I'm ok with it. If you get the smaller version of the drawers the labels will fit perfectly.
 
The Pinterest version has ten drawers but I only need three. I only wanted to create Core Drawers for reading, writing, and math.


Click on the picture below to get your copy of the labels. They will be free until Wednesday! :)


Here is what I plan on putting in my drawers...


Yours in Teaching,

Tuesday, July 2, 2013

Monday Made It....Sticker Filer and A Flip Book

This was seriously the easiest and fastest Monday Made It I have ever done. It literally only took a trip to the Target Dollar Spot, the teacher store, 2 minutes on the computer, and BAM!

My first Monday Made It is my Stickers For The Year filer.


First, I bought the all new famous pocket filer for $1.00.

Then, I labeled all the tabs with the months of the year. I began with August, since that is the first month of the year in teacher world, and I ended with July.


Next, I placed all the new stickers I bought (I was completely out) in the appropriate month.


Finally, I made a label for the front of the sticker filer, and BAM it's done!


How easy and simple is that?!? I think I'm really going to love this one!


My next Monday Made It is a Nouns, Verbs, and Adjectives Flip Book. I also made some anchor charts to go with it. Check it out here.


Yours in Teaching,


Monday, June 10, 2013

Anchor Charts for Monday Made It


Hooray! Finally my first Monday Made It of the summer is completed. I have been working very hard while my little man takes his 4 hour nap each day. He is definitely a sleeper and I'm loving every minute of it.
 
So while the little man was sleeping one afternoon I knocked out these fabulous anchor charts. When I go back in August to set up my room I plan on laminating and hanging all my anchor charts in my cabinet. I want to laminate them so that they can be reused throughout the year and in the future.
 
I have also thought that some of the charts that can be filled in might be good to hang in the writing center so my littles can work together to fill them out on their own time. Has anyone else tried this before?

 
The opinion writing chart will go get with the formula writing format that my school already uses.


The same thing goes for the informative anchor chart. I also can't wait to use this with one of my recent purchases on Tpt. :)


I'm not to sure if I really like this one or will even use it. The topic of the how-to goes in the black dotted box. Then you add your sequencing words to the other colored boxes. For example, green might say first, red says then, blue says next, and orange says last or finally.

 
I don't know how many bubble maps I have made in the past but this one will definitely get used. This will be great for writing workshop and guided reading groups.

 
Last year my littles had horrible pictures. They never took there time, never added details, and used very little color. It's mostly my fault because I didn't enforce or really monitor their drawings. However, next year I am going to be a stickler about this. I plan on actually taking some time to teach my littles how to draw appropriate pictures.

 
This one I plan on using to introduce my narrative writing unit. But I really haven't put much thought into that yet.
 
Let me know what you think of my reusable anchor charts. Definitely leave me a comment if you have created some fabulous ones. I have a weak spot for anchor charts and I get excited like a kid in a candy store when I see some great ones that I could make. :)
 
Yours in Teaching,


Monday, July 23, 2012

Monday Made It Number ?...I lost track

I know that I already posted but I forget about my Monday Made it. I have seen these all over pinterest and other blogs and I loved them.


I purchased silly straws at the Dollar Tree. I believe that they came is a pack of six. I don't remember where I downloaded the balloons from. So if they are from you let me know and I will add a link to your blog! :)


I know that they are pretty to look at but I plan on keeping them in the cabinet and only bringing it out for a birthday. I know, I'm no fun. But I have very limited counter space in my room.

Monday, July 16, 2012

Made it Monday and a Wedding!

I know, I know. I have not posted anything in over a week, but I have a pretty darn good excuse! My baby sister got married on Saturday, so I was extremely busy helping her get ready for her big day. The weather wasn't so nice in the morning hours but as soon as we got dressed and made our way to the venue the sun popped out! It was amazing.

My sister looked absolutely beautiful and so did everyone in the wedding party!

Introducing the new Mr. & Mrs. Patton!

The Wedding Party!


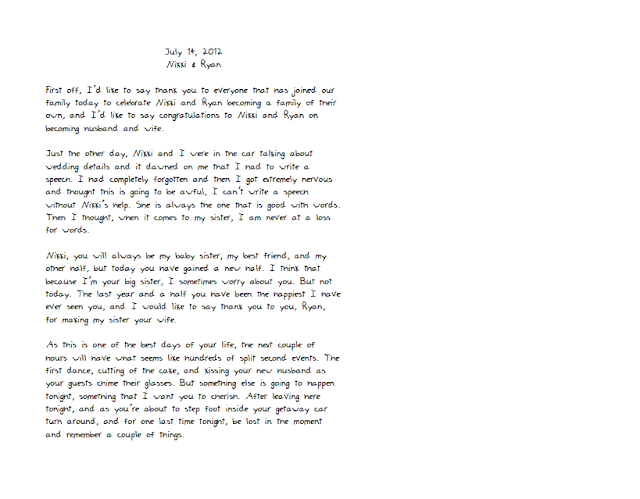
Here is my speech I gave to my sister and her new husband. It was very well received by the guests and everyone was teary eyed, even my Dad. He had to leave the reception and get himself together in the car. Awwwww.

It's a little small but hopefully you can read it.

Ok, back to school business. I have some Made it Mondays that I have worked on. Here they are...


These are eyeball reading trackers for my littles. Instead of using the boring old finger, use these pointers to track reading for young readers.
 To make these, I bought pre-dyed jumbo craft sticks, wiggly eyes, and a tin can. This was seriously the easiest project I have completed all summer. Just hot glue the wiggly eyes to the craft sticks and BAM your done!

This next project is reading around the room pointers. This was also very simple and inexpensive. (I would say cheap, but my dear mother has taught me that it's more lady like to say inexpensive. haha)
To make these, I bought wooden rods and wooden character pieces at Hobby Lobby. The sticks came in a pack and the character pieces were $.67 a piece! What a steal!!

 I wish I could take the credit for these, but I believe the idea came from One Extra Degree. Thanks for sharing, Amanda!